Insulating a roof will vastly reduce the heat loss that occurs through the roof of a house, a key element of the thermal envelope. Roof insulation will give you a warm loft, allowing you to convert it or use it for storage. There are several different options for insulation materials within a traditional pitched roof, as well as options for other types of roofs like curved roofs or dormer roofs, allowing you to save energy regardless of the design of a house.
How do you insulate a roof?
You can insulate a roof from the inside by installing insulation between or over the rafters. The three main methods are rigid insulation boards (PIR or phenolic), mineral wool or fibreglass batts, or spray foam insulation. All methods require creating a 50mm ventilation gap between the insulation and the roof covering, plus installing a vapour control layer.
How to insulate a pitched roof from inside?
Install insulation between the rafters using either rigid boards or mineral wool batts. First attach 50mm battens to the rafters to create an air gap for ventilation. Cut insulation to fit snugly between rafters, then install a vapour control layer over the insulation. You can add a second layer over the rafters for enhanced performance.
Can you insulate a roof from the inside?
Yes, you can insulate a roof from the inside by installing insulation between the rafters, over the rafters, or both. This is the most common approach for existing properties and loft conversions. Inside insulation is more cost-effective than external insulation and can be completed as a DIY project.
How to insulate a loft roof?
Loft roof insulation involves insulating at rafter level rather than at floor level, creating a "warm loft". Install insulation between the rafters with a 50mm air gap behind it for ventilation. Use either rigid PIR boards or mineral wool batts, ensuring you include a vapour control layer to prevent condensation.
How to insulate a curved roof?
Curved roofs are challenging to insulate with rigid boards or batts due to the shape. Spray foam insulation offers the best solution as it conforms to curved surfaces. Alternatively, you can insulate the loft floor instead of the roof itself if the curved roof makes rafter-level insulation impractical.
How much does it cost to insulate a roof?
DIY roof insulation costs £800-1,500 for materials in a typical semi-detached house (insulation boards, battens, vapour barrier, fixings). Professional installation typically costs £2,000-4,000. Spray foam insulation costs £3,000-7,000 professionally installed. These costs depend on roof size, insulation type and thickness.
Your Options For Roof Insulation
For traditional pitched roofs, sometimes called sloping roofs, you will be looking at three main options to insulate from the inside: installing solid insulation boards between the joists of your roof, installing fibreglass or mineral wool insulation batts within the joists, or installing spray foam insulation on your house roof.
Roof insulation will be installed as an alternative to loft insulation, giving you a warm loft and allowing you to use your loft space for storage or even as a living area. You can insulate both the floors and roof of a loft if desired, but normally people will opt for one or the other. These options are suitable for both tiled roofs and slate roofs.
Insulation Boards Between Rafters
Rigid insulation boards (typically PIR or phenolic foam) offer the best thermal performance per millimetre thickness. A 120mm board achieves similar insulation to 200mm of mineral wool, making boards ideal when headroom is limited. Boards are easy to cut to size and fit snugly between rafters. They're more expensive than mineral wool but provide superior performance in restricted spaces.
Mineral Wool or Fibreglass Batts
Mineral wool and fibreglass batts are the most affordable option and readily available. They're flexible, making them easier to fit around obstacles, but require greater thickness to achieve the same thermal performance as boards. Batts are itchy to handle and require protective equipment during installation. They're excellent for standard loft conversions where space isn't restricted.
Spray Foam Insulation
Spray foam provides comprehensive coverage and excellent thermal performance but must be professionally installed. Closed-cell spray foam creates an airtight seal, whilst open-cell foam allows moisture vapour through. Spray foam is controversial for some applications and may affect roof resale value, so research thoroughly before choosing this option.
Make Sure Your House Roof is Suitable for Insulation
If you're looking to install insulation in an older property, maybe as a way to top up or replace loft insulation, you should first make sure your property is suitable for roof insulation. Here are some of the key points to take into account:
- Planning Permission and Stairs: If you are looking to undertake a loft conversion, you will need to make sure your loft is suitable for conversion. There are both structural and accessibility conditions a loft conversion must meet (such as being accessible via a permanent staircase). Additionally, a loft conversion may require planning permission depending on some factors, such as if the building is listed.
- Ventilation: Your loft roof will need to remain ventilated once you have installed insulation. This prevents the buildup of condensation, which can lead to both structural problems and health risks. However you install insulation you will need to leave gaps for adequate airflow to vents.
- Condition of Your Roof Space: Check the structure of your roof and loft, making sure the underside of the rafters and the joists are free from dampness and rot. Any structural issues should be rectified before insulation. Also ensure that there are not any animals within the roof structure, particularly bats. If you have bats within your roof you will probably not be allowed to install insulation as their nesting areas are protected.
- Access: You’ll need to ensure that your loft can be accessed for insulation. This means cleaning your loft, clearing everything away, vacuuming your exposed rafters, and ensuring that you will be able to access the upper areas of your roof. You may need to use a solid board within your loft for standing, potentially using a stepladder to access the full height.
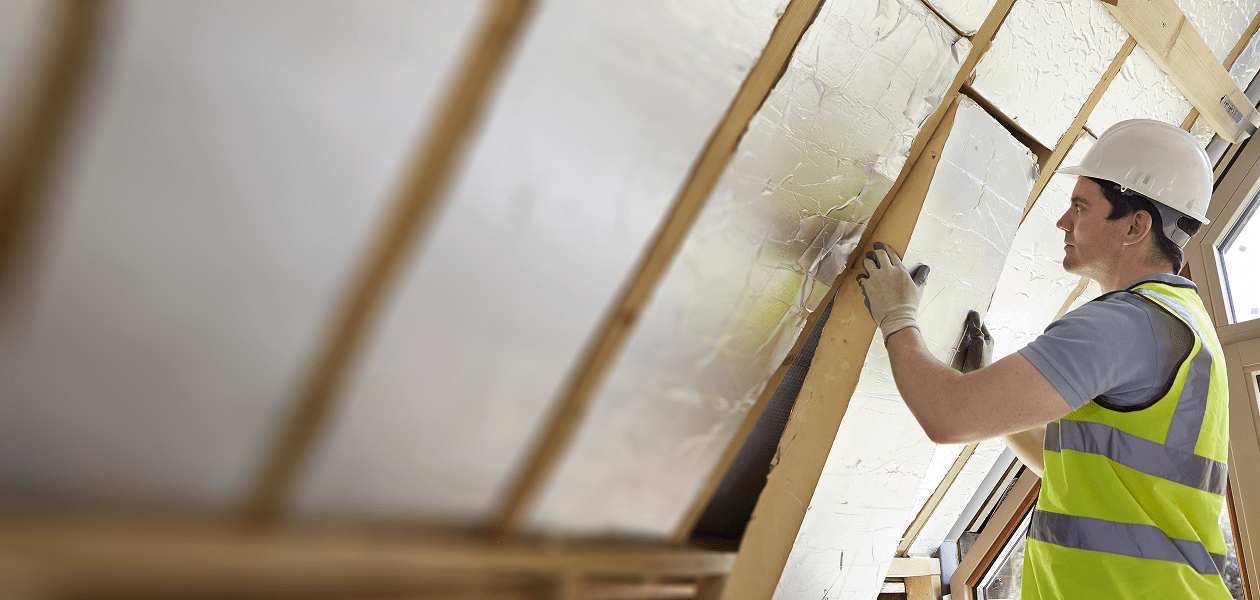
How to Insulate a Roof With Boards
What You Need
- 120mm of Rigid Foam Insulation Board
- Flat Surface
- Straightedge Ruler
- Permanent Marker Pen
- Utility Knife
- Clamp or Vice (rubberised)
- Measuring Tape
- Tantalised Roofing Battens (50mm)
- Screwdriver and Wood Screws / Nail Gun
- Vapour Control Layer (if the board doesn’t contain one)
- Staple Gun
Step-by-Step Installation
1. Measure all gaps
You'll need to precisely measure the gaps within your roof in order to cut the boards accurately. Using a tape measure mark out and make note of each board you will need to cover the entirety of the roof. These measurements will allow you to establish how much insulation board will be needed. You can choose to either insulate between the joists, over them, or both. Measuring twice before cutting saves waste and ensures proper fit.
2. Create an air gap
If looking to install insulation boards within joists, you will need to first create an air gap. This is to allow ventilation and air movement, preventing condensation on the underside of your roof covering. An air gap will need to be 50mm wide, and the best way to ensure this is to attach timber battens of a 50mm width within your roof, which you can then place the insulation boards against.
Use tantalised roofing battens of 50mm. These should be attached to the roof joists using a screwdriver or a nail gun, running vertically from eaves to ridge on each rafter. Ensure battens are firmly fixed and won't compress under the weight of the insulation boards.
3. Cut and install insulation boards
Cut your boards to size using the utility knife method, marking lines for cutting with a straightedge ruler and a permanent marker pen, and cutting over a solid surface. Score deeply along the marked line, then snap the board cleanly. Your insulation boards should snugly fit within your roof between the rafters, though you can use some sealant on the back to fix them to the roofing battens if needed.
Work systematically from one end of the roof to the other, ensuring each board fits tightly against its neighbours to avoid gaps. Cut boards carefully around obstacles like pipes or wiring.
4. Install vapour control layer
Some insulation boards include a built-in vapour control layer on the foil facing, but in cases where they do not you will need to install one. Vapour barriers are sheets that can be fixed to your roof with a staple gun. You can make a fold at each joist to attach with a thicker layer. If you need to overlap sheets, staple a solid join between them, overlapping by at least 100mm.
The vapour control layer goes on the warm side of the insulation - the side facing into the loft space. This prevents warm, moist air from the house reaching the cold roof structure where it would condense.
5. Additional layers or finishing
At this stage, depending on the level of insulation you need you can install further insulation boards on top of the joists, attaching them with a nail gun. This second layer dramatically improves thermal performance and eliminates thermal bridging through the rafters. You can also attach plasterboards for decoration, which is affixed with plasterboard screws. There are options for insulation boards faced with plasterboard if needed, providing insulation and a finished ceiling surface in one product.
How to Insulate a Roof With Batts
What You Need
- 200mm of Insulated Batts
- Solid Board
- Tape Measure
- Permanent Marker
- Safety Equipment
- N95 Respirator and Goggles
- Bread Knife (mineral wool) or Utility Knife (fibreglass)
- Tantalised Roofing Battens (50mm)
- Screwdriver and Wood Screws / Nail Gun
- Staple Gun
- Vapour Control Later (if not included)
Step-by-Step Installation
1. Measure and prepare
Measure all rafters so you know how many insulation batts you will need to buy and what size you will have to cut them to. You'll need to cut your batts depending on the insulation material type, making sure to remain fully protected throughout the cutting, handling and installation.
This means gloves, a long sleeve top, an N95 respirator mask and safety goggles. Mineral wool and fibreglass both release fine fibres that irritate skin and lungs, so protection is essential. Work in a well-ventilated area and take regular breaks in fresh air.
2. Create the essential air gap
Install tanalised roofing battens to the rafters, running vertically from eaves to ridge. This ensures a 50mm air gap between your house roof and the insulation, allowing adequate ventilation. Without this air gap, condensation will form on the underside of your roof covering, leading to rot and structural damage. The battens must be firmly fixed to support the weight of the insulation.
3. Install insulation batts
Batts can be simply pushed into place between the rafters. They should have a side with a paper facing or a vapour control layer - this side should be facing into the loft (the warm side). Batts can be stapled to the joists to hold the insulation in place.
Make sure that you do not over-compress your insulation batts, as this can lessen their ability to insulate by squashing the air pockets that provide thermal resistance. If your insulation does not fit properly without compression you should cut to size for a better fit. Mineral wool should spring back slightly when fitted, filling the gap without excessive compression.
4. Install vapour control layer
If your insulation batt does not contain a vapour control layer, you will need to install one over the insulation. This can be attached to joists with a staple gun, doubling up over the joists for a secure fix. If you need to cross over between two sheets, staple a solid join with at least 100mm overlap.
The vapour control layer is critical for preventing condensation. Warm, moist air from your living spaces will pass through mineral wool if not stopped by a vapour barrier, then condense when it meets the cold roof structure.
How to Insulate a Roof With Spray Foam
Spray foam insulation is strongly dissuaded for DIY installations, due to the technical difficulties of installation, and the health and safety issues that come with it. Before opting for spray foam insulation, you should get a survey to ensure that your home is suitable. If it is, you’ll have the option of closed-cell or open-cell spray foam. Closed-cell will make your roof space completely airtight and block moisture, so your loft will need to be ventilated to avoid a buildup of condensation. Alternatively, open-cell insulation allows moisture through, though it doesn’t offer as strong a level of thermal insulation. Spray foam is installed with specialist equipment, giving a consistent covering across your roof. Using spray foam will increase your insulation costs, and it can’t really be decorated over, so if looking to convert a loft it’s unsuitable.
Can You Insulate a Roof From the Outside?
A roof can be insulated from the outside, either during the build or as a refurbishment. If refurbishing, the tiles, slates, or roofing shingles and the battens they are attached to will all need to be removed. Then a solid base will be made from wood, which will be topped with a damp-proof membrane.
Solid insulation roof boards are then added, topped by a rain-screen membrane (designed for moisture protection). Then a new set of battens and counter-battens can be attached, to which tiles, slates, or shingles can be re-laid. This is a costly process, but can have the benefits of leaving your loft roof joists visible, and not reducing your space within the loft.
Roof Insulation For Other Roof Designs
The guides above are for traditional pitched roofs (or sloping roofs) but there are other types of roofs that will have their own considerations. Some types of roofs, like chalet roofs, bungalow roofs, and A-frame roofs are essentially the same as the roof in a traditional house, and can be insulated in a straightforward way.
How to Insulate a Hip Roof
A hip roof is a pitched roof where all sides slope downwards towards the walls. Depending on the angles and height of your hip roof, there may be difficulties around ventilation, and installing insulation can contribute to these issues. You should have a full survey of your hip roof conducted before making any decisions about insulation.
How to Insulate a Log Cabin Roof
Cabins go by similar principles to normal buildings, though many opt to insulate them from the outside, to preserve the look of the exposed rafters. You’ll need to use a moisture-resistant sheet underneath the insulation boards.
How to Insulate a Curved Roof
For curved roofs you’ll be a little limited. But spray foam insulation can offer a great option, giving a full level of thermal insulation across a curved roof. Alternatively, you can opt to insulate your loft floor.
How to Insulate a Dormer Roof
Dormers are vertical breakout windows within a pitched roof. They are normally installed within converted lofts, or houses with lived-in loft space. You can insulate the rest of the loft roof normally and attach smaller boards within the cheeks of the dormer, if possible. Upgrading to double glazing within the dormer window, and ensuring all gaps are sealed, will also increase the thermal insulation of your dormer roof.